获取PPT中选中图片的裁剪、高宽、位置,并在其他图片上重用
付永超 / 2021-08-21
编写该代码的目的:
初衷
我最近在撰写一些教程类的PPT,撰写过程繁琐、重复,其中有很多操作步骤是一样的,PPT的部分页面时可以重用的,但是PPT页面中对应的截图不能重用,因为有变化;截图、粘贴、裁剪、缩放、移动位置、删除旧图,一顿操作枯燥而乏味。。。。。
我尝试寻找现有工具简化这一过程,努力的搜索与尝试了一番,发现唯一可堪一用的是“Pocket(口袋动画)”中的“设计”→“定位排版”→“对象尺子”、“应用尺子”;此功能可以实现图片的“宽高”、“位置”的获取与重用,这虽然可以减轻一些工作,但“裁剪”这一步仍然费劲,继续搜索而无所获。
于是,该代码代码诞生了!
正文
代码
'''创建时间:2021年8月18日
'''最近一次更新时间:2021年10月18日
'''作者:***
'''作者邮箱:***
'''用途概述:用于获取PPT中图片的高与宽的缩放系数、X与Y方向的位置、上下左右方向的裁切百分比、图片的显示(裁切框)的宽与高,并对这些信息进行设置。
'''更新说明:
'''2021 年10月18日更新:区分出了"图片"与"图片框"的概念,从而在缩放、位置、裁切中正确的获取到图片的原始大小【origHeight = .PictureFormat.Crop.PictureHeight】,并在"图片框"大小中沿用原来的获取到"图片"的原始大小语句用于获取"图片框"的大小【modeler01_Height = .Height】

Dim modeler01_CropTop As Single
Dim modeler01_CropRight As Single
Dim modeler01_CropBottom As Single
Dim modeler01_CropLeft As Single

Dim modeler01_ScaleHeight As Single
Dim modeler01_ScaleWidth As Single

Dim modeler01_Height As Single
Dim modeler01_Width As Single

Dim modeler01_Top   As Single
Dim modeler01_Left  As Single

Sub 获取_图片_裁切_缩放_位置_删除信息()
'''All+Delete
    Call test_获取_图片_裁切信息
    Call test_获取_图片_缩放信息
    Call test_获取_图片_位置信息
    Call test_删除
End Sub
Sub 设置_图片_粘贴_裁切_缩放_位置_信息()
'''All+Paste
    Call test_粘贴
    Call test_设置_图片_裁切信息
    Call test_设置_图片_缩放信息
    Call test_设置_图片_位置信息
End Sub
Sub 获取信息_删除_粘贴_设置()
''' 获取_删除_粘贴_设置 一次全部完成
    Call test_获取_图片_裁切信息
    Call test_获取_图片_缩放信息
    Call test_获取_图片_位置信息
    Call test_删除
    Call test_粘贴
    Call test_设置_图片_裁切信息
    Call test_设置_图片_缩放信息
    Call test_设置_图片_位置信息
End Sub

Sub 获取_图片_裁切_缩放_位置信息()
'''All
    Call test_获取_图片_裁切信息
    Call test_获取_图片_缩放信息
    Call test_获取_图片_位置信息
End Sub
Sub 设置_图片_裁切_缩放_位置信息()
'''All
    Call test_设置_图片_裁切信息
    Call test_设置_图片_缩放信息
    Call test_设置_图片_位置信息
End Sub

Sub 获取_图片_裁切_缩放信息()
'''Cut_Scale
    Call test_获取_图片_裁切信息
    Call test_获取_图片_缩放信息
End Sub
Sub 设置_图片_裁切_缩放信息()
'''Cut_Scale
    Call test_设置_图片_裁切信息
    Call test_设置_图片_缩放信息
End Sub

Sub 获取_图片框大小_图片位置信息()
'''Size_Position
    Call test_获取_图片框_高宽信息
    Call test_获取_图片_位置信息
End Sub
Sub 设置_图片框大小_图片位置信息()
'''Size_Position
    Call test_设置_图片框_高宽信息
    Call test_设置_图片_位置信息
End Sub

Sub test_获取_图片_裁切信息()

Set shape_1 = ActiveWindow.Selection.ShapeRange(1)
Set b = shape_1.PictureFormat

With shape_1.Duplicate
    .ScaleHeight 1, True
    .ScaleWidth 1, True
    origHeight = .PictureFormat.Crop.PictureHeight
    origWidth = .PictureFormat.Crop.PictureWidth
    .Delete
End With

With shape_1
    modeler01_CropTop = .PictureFormat.CropTop / origHeight
    modeler01_CropRight = .PictureFormat.CropRight / origWidth
    modeler01_CropBottom = .PictureFormat.CropBottom / origHeight
    modeler01_CropLeft = .PictureFormat.CropLeft / origWidth
End With

Debug.Print "Get modeler"
Debug.Print "   origHeight * origWidth   "; origHeight; " * "; origWidth
Debug.Print "   modeler01_CropTop   "; modeler01_CropTop
Debug.Print "   modeler01_CropRight "; modeler01_CropRight
Debug.Print "   modeler01_CropBottom    "; modeler01_CropBottom
Debug.Print "   modeler01_CropLeft  "; modeler01_CropLeft

End Sub
Sub test_删除()
    Set shape_1 = ActiveWindow.Selection.ShapeRange(1)
    shape_1.Delete
End Sub
Sub test_粘贴()
    Set shape_1 = ActiveWindow.Selection.SlideRange
    shape_1.Shapes.Paste
End Sub
Sub test_设置_图片_裁切信息()

Set shape_1 = ActiveWindow.Selection.ShapeRange(1)

With shape_1.Duplicate
    .ScaleHeight 1, True
    .ScaleWidth 1, True
    origHeight = .PictureFormat.Crop.PictureHeight
    origWidth = .PictureFormat.Crop.PictureWidth
    .Delete
End With


With shape_1
    .PictureFormat.CropTop = modeler01_CropTop * origHeight
    .PictureFormat.CropRight = modeler01_CropRight * origWidth
    .PictureFormat.CropBottom = modeler01_CropBottom * origHeight
    .PictureFormat.CropLeft = modeler01_CropLeft * origWidth
End With

Debug.Print "Set modeler"
Debug.Print "   modeler01_CropTop   "; modeler01_CropTop
Debug.Print "   modeler01_CropRight "; modeler01_CropRight
Debug.Print "   modeler01_CropBottom    "; modeler01_CropBottom
Debug.Print "   modeler01_CropLeft  "; modeler01_CropLeft

End Sub


Sub test_获取_图片_缩放信息()
Set shape_1 = ActiveWindow.Selection.ShapeRange(1)
Set b = shape_1.PictureFormat

With shape_1.Duplicate
    oldHeight = .PictureFormat.Crop.PictureHeight
    oldWidth = .PictureFormat.Crop.PictureWidth
    .ScaleHeight 1, True
    .ScaleWidth 1, True
    origHeight = .PictureFormat.Crop.PictureHeight
    origWidth = .PictureFormat.Crop.PictureWidth
    .Delete
End With

modeler01_ScaleHeight = oldHeight / origHeight
modeler01_ScaleWidth = oldWidth / origWidth

Debug.Print "   modeler01_ScaleHeight   "; modeler01_ScaleHeight
Debug.Print "   modeler01_ScaleWidth    "; modeler01_ScaleWidth


End Sub
Sub test_设置_图片_缩放信息()
Set shape_1 = ActiveWindow.Selection.ShapeRange(1)
Set b = shape_1.PictureFormat

With shape_1
    .ScaleHeight modeler01_ScaleHeight, True
    .ScaleWidth modeler01_ScaleWidth, True
End With

End Sub

Sub test_获取_图片框_高宽信息()
Set shape_1 = ActiveWindow.Selection.ShapeRange(1)
Set b = shape_1.PictureFormat

With shape_1
    modeler01_Height = .Height
    modeler01_Width = .Width
End With

Debug.Print "   modeler01_Height   "; modeler01_Height
Debug.Print "   modeler01_Width    "; modeler01_Width


End Sub
Sub test_设置_图片框_高宽信息()
Set shape_1 = ActiveWindow.Selection.ShapeRange(1)

With shape_1
    .Height = modeler01_Height
    .Width = modeler01_Width
End With

End Sub

Sub test_获取_图片_位置信息()
Set shape_1 = ActiveWindow.Selection.ShapeRange(1)
Set b = shape_1.PictureFormat

With shape_1
    modeler01_Top = .Top
    modeler01_Left = .Left
End With

Debug.Print "   modeler01_Top   "; modeler01_Top
Debug.Print "   modeler01_Left    "; modeler01_Left


End Sub

Sub test_设置_图片_位置信息()
Set shape_1 = ActiveWindow.Selection.ShapeRange(1)

With shape_1
    .Top = modeler01_Top
    .Left = modeler01_Left
End With

End Sub
全部的代码就是上述了,主要是实现了对所选中对所选中图片的“裁切”、“宽高”、“位置”信息的获取与设置,并额外编写了用于串联这几个独立过程的代码,便于一键完成{“裁切”、“宽高”、“位置”的获取并删除选中的图片,然后从剪贴板粘贴一个新的对象,并完成对新对象的“裁切”、“宽高”、“位置”的设置}~!
使用方法:
1.我将上述代码处在一个PPT的宏模块中,之后将PPT另存为后缀名为“.ppam”格式,然后设置为PPT的加载项。
2.下载、安装“RunMacro”程序,修改“”安装目录(C:\Program Files\RunMacro)下的“PowerPoint.xml”文件,修改后内容如下:
<customUI xmlns="http://schemas.microsoft.com/office/2009/07/customui">
	<ribbon startFromScratch="false">
		<tabs>
			<tab id="Tab1" label="RunMacro">
				<group id="Group1" label="Cut">
					<button id="Button1" label="Get_Cut" imageMso="G" size="large" onAction="Shape_Cut_size_position.ppam!模块1.test_获取_图片_裁切信息"/>
					<button id="Button2" label="Set_Cut" imageMso="S" size="large" onAction="Shape_Cut_size_position.ppam!模块1.test_设置_图片_裁切信息"/>
				</group>
				<group id="Group2" label="Scale">
					<button id="Button3" label="Get_Size" imageMso="G" size="large" onAction="Shape_Cut_size_position.ppam!模块1.test_获取_图片_缩放信息"/>
					<button id="Button4" label="Set_Size" imageMso="S" size="large" onAction="Shape_Cut_size_position.ppam!模块1.test_设置_图片_缩放信息"/>
				</group>
				<group id="Group3" label="Size">
					<button id="Button5" label="Get_Size" imageMso="G" size="large" onAction="Shape_Cut_size_position.ppam!模块1.test_设置_图片框_高宽信息"/>
					<button id="Button6" label="Set_Size" imageMso="S" size="large" onAction="Shape_Cut_size_position.ppam!模块1.test_设置_图片框_高宽信息"/>
				</group>
				<group id="Group4" label="Position">
					<button id="Button7" label="Get_position" imageMso="G" size="large" onAction="Shape_Cut_size_position.ppam!模块1.test_获取_图片_位置信息"/>
					<button id="Button8" label="Set_position" imageMso="S" size="large" onAction="Shape_Cut_size_position.ppam!模块1.test_设置_图片_位置信息"/>
				</group>
				<group id="Group5" label="Cut_Scale">
					<button id="Button9" label="Get_Cut_Size" imageMso="G" size="large" onAction="Shape_Cut_size_position.ppam!模块1.获取_图片_裁切_缩放信息"/>
					<button id="Button10" label="Set_Cut_Size" imageMso="S" size="large" onAction="Shape_Cut_size_position.ppam!模块1.设置_图片_裁切_缩放信息"/>
				</group>
				<group id="Group6" label="Size_Position">
					<button id="Button11" label="Get_Cut_Size" imageMso="G" size="large" onAction="Shape_Cut_size_position.ppam!模块1.获取_图片框大小_图片位置信息"/>
					<button id="Button12" label="Set_Cut_Size" imageMso="S" size="large" onAction="Shape_Cut_size_position.ppam!模块1.设置_图片框大小_图片位置信息"/>
				</group>
				<group id="Group7" label="All">
					<button id="Button13" label="Get_All" imageMso="G" size="large" onAction="Shape_Cut_size_position.ppam!模块1.获取_图片_裁切_缩放_位置信息"/>
					<button id="Button14" label="Set_All" imageMso="S" size="large" onAction="Shape_Cut_size_position.ppam!模块1.设置_图片_裁切_缩放_位置信息"/>
				</group>
				<group id="Group8" label="All_Delete">
					<button id="Button15" label="Do_G_A" imageMso="G" size="large" onAction="Shape_Cut_size_position.ppam!模块1.获取_图片_裁切_缩放_位置_删除信息"/>
					<button id="Button16" label="Do_All" imageMso="A" size="large" onAction="Shape_Cut_size_position.ppam!模块1.获取信息_删除_粘贴_设置"/>
				</group>
			</tab>
		</tabs>
	</ribbon>
</customUI>
注:由于我不知到该如何解决与实现“在PPT中通过菜单按钮调用宏的方法”,所以使用搜索的一个替代方案,安装“RunMacro”程序,然后借助“RunMacro”程序实现“在PPT中通过菜单按钮调用宏”,上述XML文件就是用于配置按钮、以及按钮对应的宏;关于“RunMacro”的见我参考的此文“https://www.cnblogs.com/ryueifu-VBA/p/11108695.html”,“RunMacro”下载连接“https://files.cnblogs.com/files/ryueifu-VBA/RunMacro-Setup.zip”。
3.然后就可在PPT中通过菜单按钮调用自己所编辑的上述的宏用于图片信息的获取与修改了~!
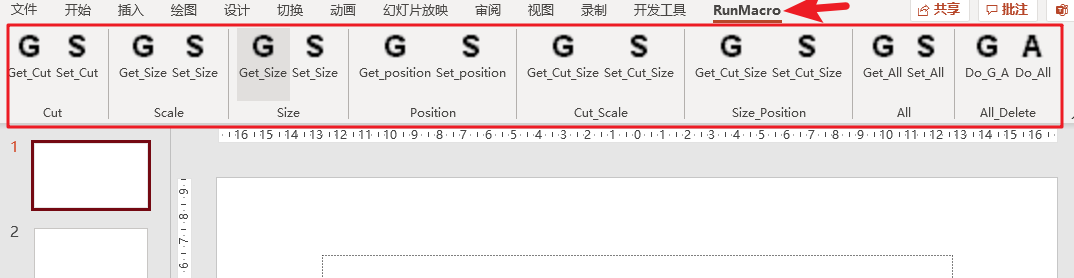
演示动画
小结
最开始的问题至此得到了解决,如果看官你觉的有需求可以拿去使用,也可以在其中再增加些其他的步骤,比如直接一键 获取信息、从剪贴板粘贴图片、设置粘贴的图片,真正的一键解决,或者将这些宏绑定至快捷键,摆脱繁琐的鼠标操作,等等。